Wednesday, August 31, 2016

CUTTING BACK DAYLILIES


WEDNESDAY, AUGUST 31, 2016

62.1°, dark sky and pouring rain this morning. I just returned from riding the perimeter in the cart to check fences and make sure the critters of the forest didn't stop by for a meal last night. The various plants can't possibly be as tasty as they were a couple weeks ago but the well-mowed grass in between all the gardens grows quickly and might be enticing.

During the past week, I have received three phone calls asking if it is too early to trim back daylilies. It's been so dry this season that no daylilies look the way we wish they would. Now is the time that the late bloomers typically provide nice color when other flowers bloomed extra early or stopped blooming because of the heat. Yes, the late bloomers are blooming but their foliage shows the stress caused by those multiple 90° days.

Here at the flower farm, we begin trimming back the daylilies now for a couple reasons. We try to get through as many rows as possible to trim back the foliage and spent flower scapes, and pull out the debris at the base of the clumps. This reduces the possible carry-over of fungal issues or insects from this year to the next. We trim to 3"-4" above the ground and after the clean up I try to spray everything with horticultural oil. That oil is the one used by orchardists in the spring to suffocate insects and insect eggs that might be hiding on the bark of the fruit trees such as apples, pears, plums and cherries. It's commonly used and is easy to apply. I use about a third of what is recommended mixed with water with a squirt of dish detergent added to serve as a sticker. That helps the oil hold onto the plant better. As I spray I try to be sure to direct the spray to the spent scapes which once cut are hollow inside and can become hiding places for insects. Hort oil is available at agricultural or hardware type stores, is not toxic and is worth the effort.


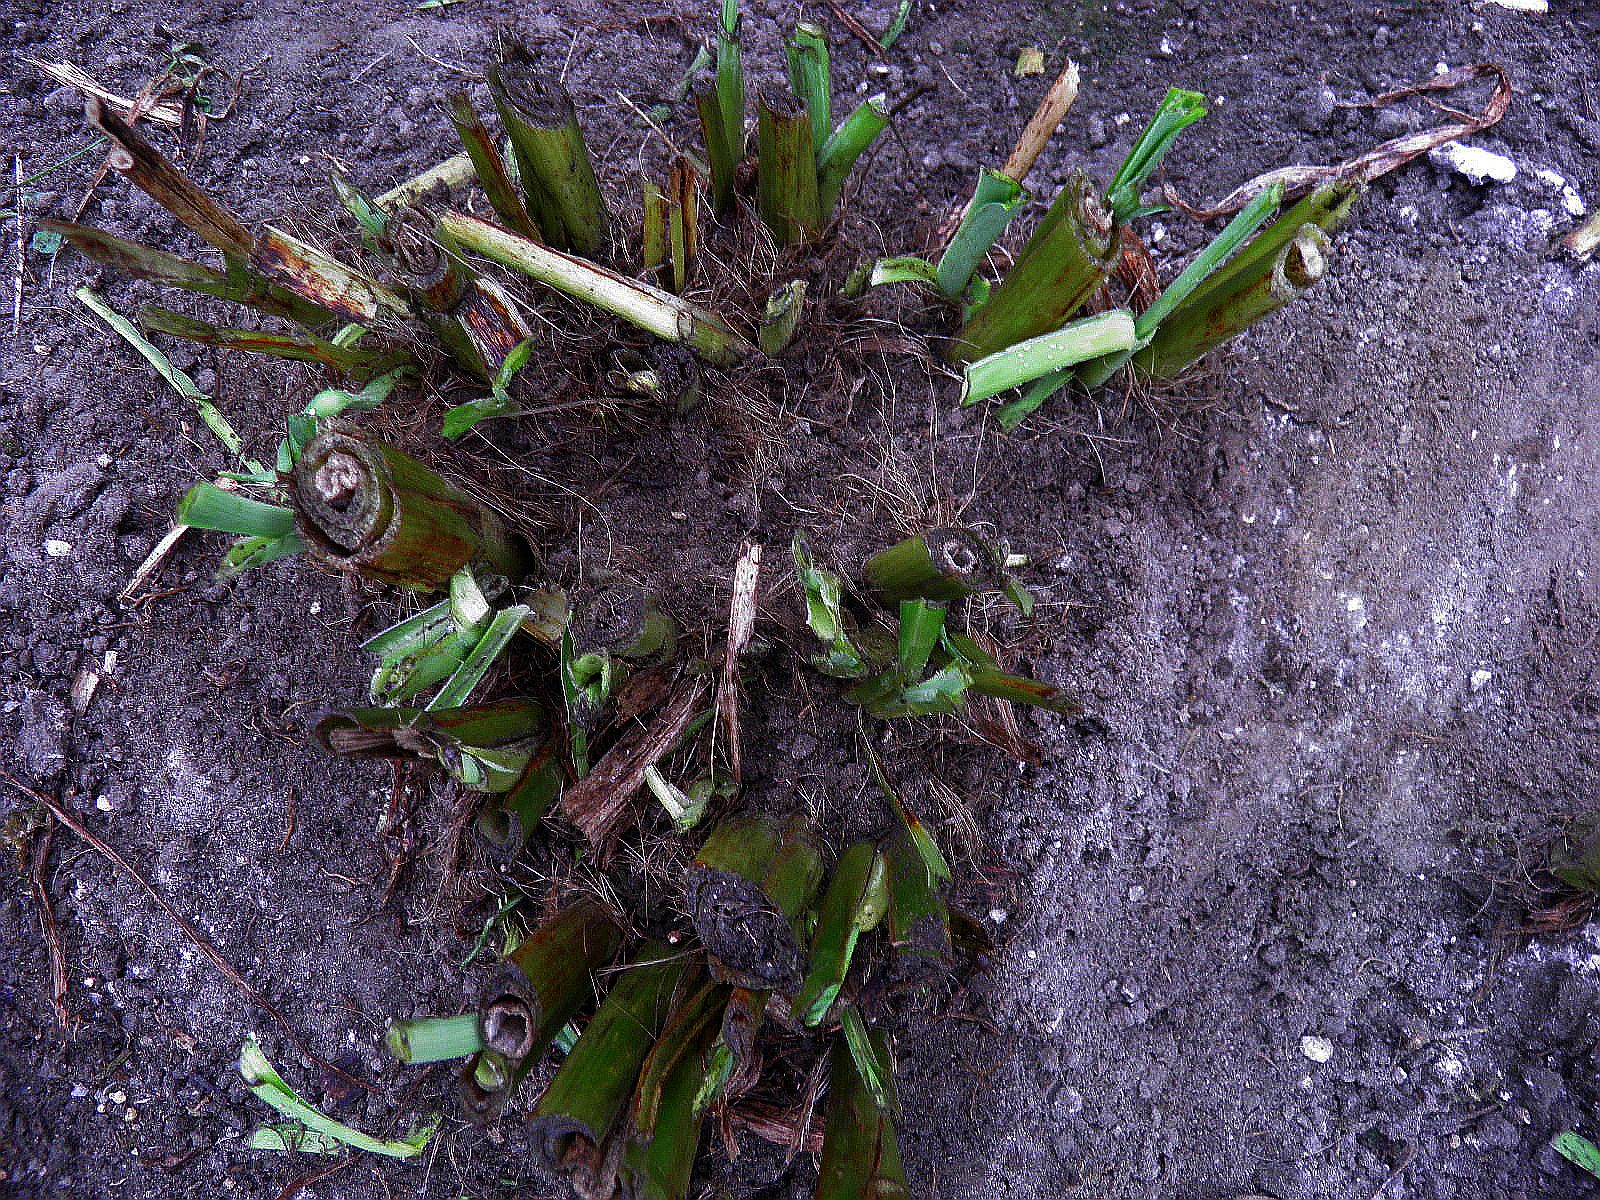
Trimming back the foliage makes digging and dividing the daylilies that much easier. They weigh less and you are less likely to get a scape in the eye when you bend over to pick up a clump. The absence of leaves makes it easier to see how the plant has been growing and where to make your divisions based upon how you will use the plant once it is divided. We pot up several fans in gallon and six quart pots for the following year and line the rest out in rows to keep our stock going. Depending upon popularity, Gail plants multiple plants in 3 and also 5 gallon pots for gardeners who want a better deal on a special plant or who want bigger garden impact with a large clump. The big pots also provide a dramatic presentation at the front of our parking area and their visibility from Route 2 draws people in.

So to answer the question "Is it too early to trim back my daylilies now?" ......no, it's not too early. If you have some time, get trimming!

Writing from the flower farm where the rain is falling heavily and although I have plenty of outside chores I'm not in the mood to get wet. Stop by!

George Africa
The Vermont Gardener
On Facebook as Vermont Flower Farm & Gardens and also as George Africa
On Twitter as vtflowerfarm

And always here to help you grow your green thumb!


Tuesday, August 23, 2016

Dividing Daylilies


Tuesday, August 23, 2016

44.5°,  windless, sky full of stars, waning gibbous moon at 69%, quiet. Just back in with Karl the Wonder Dog. It's too early to be awake but I heard something at the back door and have been up ever since. The bears are arriving too often to eat the ripening black berries outside my office window and one of them has a bad habit of coming to the door. My guess is that he has been successful at some other house on his tour. We have taken to locking the storm door at night but this added challenge apparently is irritating the visitor a bit.

Daylilies--we love 'em-- but there comes a time when they need dividing. Here at the flower farm our motivation is to constantly have the right number for sales and that means dividing some both spring and fall. As visitor numbers decrease now compared to when the daylilies are peaking, it gives us time to begin to dig and divide. Some folks are hesitant to do this but if your clumps  are overgrowing your original garden design or if you notice a decrease in the number of scapes per plant or if there are almost no scapes in the middle of your clumps,  then it's time to thinking about dividing them.

The whole digging and dividing thing is real work so consider some stretching first to limber up before the digging, bending and lifting begin. We use shovels or spade forks and often add a 6 foot pry bar to the tool mix. I hear there is a new daylily separator tool on the market that works quite well. Here at the flower farm we have clay soil in many places and I have been reluctant to spend the money to try the tool knowing how difficult the clay is to dig. 


 I like to divide daylilies after a good rain when the soil is looser and the process goes quicker. I dig 8"-10" away from the base of the plant, circling the entire plant before using the shovel or fork to pry the plant out. If it is a large clump, I resort to a pry bar as the opportunity for more leverage makes the task easier.


Once the clump is out of the ground, I use a garden hose and high pressure to wash it clean of dirt. Then I move it to a cutting table. We do hundreds and hundreds of divisions so we consider ergonomics and have purchased a cutting table that has a sink and is at our standing height. Friend Gail T found an old metal wash sink from a farm milk house and aside from a need for a little more leg height and a cutting board on one end, that works great and can handle more daylilies in the sink sections. I stress ergonomics because I have never known a gardener who didn't get older. 


Last week I replaced all my cutting knives as our dig and divide season is starting. I go to Wally World and buy a bunch of their large, serrated meat knives at 88 cents each. Yes, it is a disposable world, but these work well for a season, rust over time, but hold the edge, unlike the regular cutting knives which dull in minutes.


The size of the divisions depends upon what you're looking for. A large clump that measures 30" in diameter can be split in half with one piece returned to its orginal location and the other half moved to a different garden, shared with a friend or divided into pieces. I try to make each division three fans whether it's going back into the garden to grow again or if the divisions are going into pots for sale. If I happen to have a daylily that is in short supply and difficult to find on the market, I might divide down to single fans and line them out in the garden in a trench well amended with compost and fertilizers to bring the production up as quickly as possible. Daylilies are like people--they grow up differently--and until you learn their nature, you don't know how long it will take for your new divisions to reach saleable size if you start with single fans. 

Here is a picture of three large divisions I made from a three year old clump of Alabama Jubilee. Any one of these will probably produce 4-6 scapes next season and in three-four years will be bushel basket size. Give it a try yourself!


Writing from the mountain above Peacham Pond where daybreak is still some time away as the days of me being in the garden by 4:30 have passed until next May. Happy gardening!!

George Africa
The Vermont Gardener
Vermont Flower Farm
On Facebook writing as George Africa and on a Like Page Vermont Flower Farm and Gardens. 
On Twitter as vtflowerfarm
Writing on many social media garden sites too

Always here to help you grow your green thumb!

Monday, June 27, 2016

Hostas: Slugs and Snails

 Monday, June 27, 2016

A clear morning here on the mountain as I pack the truck to head to the flower farm for the day. Crows are talking loudly at the compost pile, fighting over parings from a cantaloupe. The sky is clear, the morning without wind. This is the best part of today because the weather folks tell us to expect high humidity and temperatures in the 90s later on. 

The dry temperature has brought on weevils in the hostas. These tiny black and brown insects make the bazillion little holes that bother us to see in some hosta leaves. There's not much we can do about them save for chemical treatments which most of us avoid.

This time of year we typically see increasing numbers of slugs and snails but the numbers have been down because it has been so dry. This afternoon we are to expect thunderstorms and tomorrow heavy rains are supposed to approach. With these changes, we may see more slugs and snails in the hosta plants.


Many years ago I read some research from Hawaii where the Department of Agriculture was on a mission to quiet a noisy tree frog that disrupted tourists sleep patterns. One of the outcomes of the research was finding that caffeine kills slugs and snails and that hosta growers could use coffee to not only improve the organic content of their garden soils but eliminate pesky slugs that added unsightly holes to hosta leaves. As soon as I read the research I told all my hosta friends and I also started taking the coffee grounds directly to hosta gardens instead of the compost pile. I'll always remember starting with the hosta Invincible because its thin, shiny green leaves always seemed to be a magnet for slugs. The great news was that it worked!

So if you drink coffee or know friends or shop owners who will part with coffee grounds, move them to your hostas--the grounds, not the friends. Encircle each plant and smile for a change. Hostas without holes in July and August are just plain nice!!

Writing from the mountain above Peacham Pond where the cool morning is nice but I have to get to work in the valley. Come visit us!

George Africa
The Vermont Gardener
Vermont Flower Farm
On Facebook as Vermont Flower Farm and Gardens and also as George Africa, a FB page with lots of flower pictures.
On Twitter as vtflowerfarm
Writing on various gardening-related sites

And always here to help you grow your green thumb!

Monday, June 13, 2016

Putting Dill To Another Use

 Monday, June 13, 2016

A friend suggested I remind gardeners again about the benefit of planting dill or fennel in your gardens even if you don't' care for the two plants or use them in your cooking. Dill and fennel provide housing for hover flies, the tiny flying insects that sometimes are misrepresented as a "baby bumblebee" . Hover flies eat aphids and don't discriminate as to which type they eat. As such, a good "crop"


of hover flies can help prevent the spread of diseases to your flowers and vegetables by eating the vectors themselves. Dill is also a natural egg laying site for tiger swallowtail butterflies so there is yet another advantage to having dill around. 

Here are a couple pictures of the insects, first on a cosmos and then on a daylily. Give it some thought. A package of dill seed is only$1-$2 and sure is worth the benefit.


Writing from the mountain above Peacham Pond where here at almost 9 PM the rain has just stopped again. It looks like a good stretch of warm, clear weather starts tomorrow morning. If you're out and about, stop by the flower farm for a visit!

George Africa
The Vermont Gardener
Vermont Flower Farm
On Facebook as George Africa and also as Vermont Flower Farm and Gardens
On Twitter as vtflowerfarm

Always here to help you grow your green thumb!

The Importance of Good Soil


Monday, June 13, 2016

A damp, cold, blustery day here on the mountain above Peacham Pond this morning. 44.3° with a varying, three to five mph wind. Karl the Wonder Dog has been out for two walks but each time as the rain increased,  he ran for the house. He doesn't know that we really need the rain but he does know that he likes the warmth of the wood stove that has been fired up since last night.

We have been busy at the flower farm since our Mother's Day opening and have had a very encouraging number of visits, customers and also web based plant orders from across the US. We have always encouraged people to stop by with gardening questions even if they aren't in the market yet for plants. This gives people the opportunity to see who we are and how devoted we are to growing good plants.

Yesterday afternoon during a very brief break in the rain, I started to weed out the new lilac garden alongside Route 2, down by the hosta display garden. As I kneeled on the slope, my backside getting wet at times, it came to me that I should remind folks to think about their soil more than they probably do. The soil I was working was extremely acidic soil, full of a variety of weeds but still growing very nice two year to four-year-old lilacs because I had amended the planting holes well. The surrounding soil is a disgrace to a good gardener, however, and clearly needs some  help. Just the same it serves as an example of the importance of  good soil.

I once worked with a young man who was in the business of planting food crops for hunters interested in "growing" a larger deer crop, bear and turkeys on their own land. He taught me to notice the weeds that were growing in my soils and said that from there I could adjust the soil accordingly. His comment was that if I could balance the soil better, many of the nuisance weeds would disappear and the plants I wanted to grow would do much better. He was correct.

There are a couple of good books on the market that list the weeds of New England and the soil types they enjoy. There are probably similar books that will help you regardless of where you read this blog from. For me, maple leaves are the chief amendment because I know they contribute a great deal to improving my soil and I also have an abundant supply of them each fall. I also buy several tons of Foster Brothers Composted Cow Manure each year because it helps with my plants and is weed-free. I do not broadcast it within 


my gardens but instead use it within rows or under each new plant. This helps the plants more directly and short term is a little less expensive. Since Gail and I started Vermont Flower Farm on Route 2, we have literally added tractor trailer loads of manure, leaves and various other organic materials to our garden beds. Our site was actually the bottom of the Winooski Ocean 15,000 years ago so it's a soil that needs a great deal of "rebalancing". We have a long way to go and perhaps you do too but develop a plan like we have and continuously try to improve your soil. It makes a difference!


Writing from the mountain above Peacham Pond where the rain has started again. I'm headed to the flower farm in minutes and will be there until noon when Gail takes over and I head for an appointment. If you have any gardening questions, let us know.  Sharing good information about gardening is a passion with us!

George Africa
The Vermont Gardener
On Facebook as George Africa and also as Vermont Flower Farm and Gardens
On Twitter as vtflowerfarm
Writing on various gardening-related social media formats

And always here to help you grow your green thumb!

Wednesday, May 25, 2016

Spacing Hostas


Wednesday, May 25, 2016

I'm heading to the flower farm in minutes and by the end of the day I'll be heading to Maine for a few days starting with time at Coastal Maine Botanical Gardens in Boothbay. Before I leave,  I wanted to invite anyone thinking about developing a hosta garden to consider stopping by Vermont Flower Farm in the next week or so to see how I have planted things.

Hostas are easy plants to deal with but it's difficult sometimes to know the mature size. Here in Vermont it takes 5-6 years for most plants to max out and sometimes this is confusing based upon less than accurate registration information regarding mature size. Saying a hosta will be small and finding it's a "small" monster may mean you didn't leave enough room for the mature plant. Planting some variety of  Sum and Substance by the back door may leave you with a nice mental image at planting time but a difficult entrance down the road 4-5 years.  I guess I am just suggesting that any information to use as reference might be useful and our gardens could serve to help.

If you're out and about, stop by and walk down to the display garden. The potted hostas are looking especially nice this year and most all are featured on our website, http://vermontflowerfarm.com


Writing from the mountain above Peacham Pond where the fog is thick and where Karl the Wonder Dog wants to go for a second walk. 

George Africa
The Vermont Gardener
On Facebook as George Africa and also as Vermont Flower Farm and Gardens

Always here to help you grow your green thumb!

Sunday, May 01, 2016

Daylilies: Digging, Dividing, Replanting

 Sunday, May 1, 2016

May Day 2016. 36.1° at almost 6 AM, the warmest morning we have had in a couple weeks. The waning crescent moon offers up 35% illumination through thickening clouds as the darkening sky serves in obvious contrast to yesterday's wonderful blue sky and bright sunlight. Yesterday was a busy day at the flower farm and it left us with a few new aches and pains but with a great sense of accomplishment. Friends Julie and Michelle arrived to help, Julie with planting and Michelle with weed whacking. Alex dug and divided daylilies and Gail and I did what we do everyday--a little of everything. I asked Michelle to take some quick shots of Alex and me as we worked up some of the species daylily named Citrina, a tall lemony color with a fragrance to match.


Alex has the "digging" part of this process figured out now and he can get a bunch of daylily clumps out of the ground in short order. We use the black plastic bulb crates from years gone by to carry and lift the clumps to the truck and then we set up by the edge of the field to work off the tailgate and divide the clumps. We always use the 99 cent, throw-away knives that box stores sell so when they get dull they can be tossed away. It's still quite a chore to get through the clumps and Citrina is an example of a tough daylily. These had been in the ground for about 4 years and the clumps weighed about 35-40 pounds each before we started to break them down.

Once the clumps are broken down--usually into quarters, we wash them with water and then throw them into crates based upon size.


Often when we divide large roots like these Citrina, folks think the roots will die because we are cutting straight through big masses. We usually let them dry off for a couple days before planting and have never had any losses. 


It's an ongoing process but one of many that Alex has picked up with a sense of enthusiasm. I know he is doing well when I hear him singing to himself. Autism is something that never goes away but there are certain things that make daily life better. Alex loves being outside and really enjoys the company of the variety of friends who appear to help us get through spring planting and summer responsibilities.


Everything we do in these pictures follows what we have been doing for years and years so if you are apprehensive about cutting up your daylilies.... with fear of daylily death or destruction... fear not!

You might find yourself a little mud-spattered and wet  during the process, your back might ache a bit from bending and lifting but the end product will be crates, baskets or buckets of divisions that  will bring a certain joy and a few happy smiles. 


Give it a try!


Writing from the mountain above Peacham Pond this morning. Rain is predicted for later today and all day tomorrow so I'm out the door in minutes to get some outside work done. If you stop by the flower farm today and it's raining, we're likely to be in the office getting orders ready for tomorrow's mail. We officially open next Saturday but despite the many things that need to be organized before then, we are open for the season, seven days a week, 9-5 but usually later. Stop and visit!

George Africa
The Vermont Gardener
Vermont Flower Farm
On Facebook as George Africa and also as the Like page, Vermont Flower Farm and Gardens
On Twitter as vtflowerfarm
Writing on various other social media resources

And always here to help you grow your green thumb!

Sunday, April 24, 2016

Thoughts on Hydrangeas


Sunday, April 24, 2016


25.4° this morning and the temperature continues to drop even before the sun has given any thought to rising. Winter was snowless here in Marshfield, not meaning that it never snowed but that it snowed so little I only had to use the truck to plow once and truly that was more of an "I should be plowing by now" affair just after Christmas. Boots lined the utility room by the back door but often they fell over instead of being used.

Now that spring is here we continue to  have this expectation of warmer weather and garden work but after many sunny days, the ceaseless, drying winds have returned along with colder weather. This coming week we have two nights forecast that will be 20° or less. This is not good  for hosta growers such as we are.


This morning as I cruised gardening websites from around the northeast I came upon an excellent article on hydrangeas. Gail, Alex and I have been offering some hydrangeas for 6-7 years now but we never offer the pinks or blues that people often see in gardening magazines and always ask for. We stick to tried and true, cold hardy paniculatas and tell folks our experience with these and why we won't change.

Here is an  excellent article by James Kohut from the blog Northscaping.com. It offers useful information on growing Hydrangea macrophylla, the wonderful mopheads known by their trade name Endless Summer and arriving in pink or blue. The article points out what we have learned. It's not that you cannot grow these hydrangeas in this part of Vermont, but as with everything in life,  you have to work at it and at times you do not succeed. Read on, give it some thought, and if you're still persistent, talk to your area nurseryman or Master Gardener. We're sticking with the paniculatas!

Writing from the mountain above Peacham Pond where a waning gibbous moon offers brightness to the night sky. Enjoy the day!

George Africa
The Vermont Gardener
Vermont Flower Farm
Writing on Facebook as George Africa and also at Vermont Flower Farm and Gardens
On Twitter as vtflowerfarm
And always here to help you grow your green thumb!

Thursday, March 31, 2016

Pollinators

 Thursday, March 31, 2016

An interesting morning here on the mountain. Now up to 40.9° with a 3 mph breeze.  The sky is clouded over but sunlight is just beginning to emerge. It is supposed to warm to 55°-60° by noon so I am trying to wind up inside chores and get outside. In another two days the temperatures will fall again and I won't be so eager to be outside. 

There has been plenty of discussion in the past 2-3 years about the importance of pollinators. The absence of the monarch butterfly has stimulated the discussion in the east where pockets of butterflies have been obvious but not like their absence in places such as the flower farm a couple years ago. Last summer the total count was about 13 but nothing like 10 years ago. Back then I used orange colored flags to mark off 12 X 50 foot garden plots I was preparing to rototill for daylilies. The monarchs were in good numbers then and they appeared around the garden sitting by or on the flags as if orange flags were their favorite friend. Never since have there been so many. 


 So for my part in a personal "Bring Back The Pollinators" campaign I have begun to plant flowers, some annuals, some perennials, that are proven to me to be pollinator magnets. Yesterday I ordered in three flats of 50 plugs each of  Vernonia noveboracensis, an ironweed sometimes commonly named New York Ironweed. I have never found it growing wild in Vermont but understand there are places in New England where it can be found. It caught my attention several years ago at the Coastal Maine Botanical Gardens where it was mass planted in groupings of 20-40 plants. It grows to be 6-7-8 feet tall and  that height in a large planting is an impressive standout even for long distance eyes.


This ironweed works well with the equally tall Eupatorium maculatum 'Gateway', any of the 3-4 foot heleniums, the 6-7 foot tall Helianthus 'Lemon Queen' , 5-6 foot tall Veronicastrum, and the 6'-7' tall annual Tithonia commonly referred to as Mexican Sunflower.  Grow some annual Verbena bonariensis in front of the entire mass and I guarantee you will be pleased with the color and will have plenty of butterflies, moths, bees, and hummingbirds to look at.  You do not have to do this all at once, as a plant here, a plant there will spread and get to the same grouping size over time. Just remember the mature sizes of these plants so they match your site.


If you stop by the flower farm this summer, ask me about pollinator plants. I'll point out what we might still have for sale and you can check out the garden plantings too.


Writing from the mountain above Peacham Pond where in the time I have written this the temperature has risen 6 degrees and the wind speed one mph. I better get going!

George Africa
The Vermont Gardener
Vermont Flower Farm
On Facebook as Vermont Flower Farm and Gardens and also as George Africa
On Twitter as vtflowerfarm
And always here to help you grow your green thumb!!

Saturday, March 26, 2016

Eupatorium Joe Pye Weed


Friday, March 26, 2016


An off and on day that finally settled down in the afternoon and provided sunshine to suggest clearing sky and a nice weekend. This is a picture from last season of our hosta and shade garden. We think it's a very nice place to visit. It's still under construction after 6+ years but many of the hostas are mature at this point  and offer a first-hand look at where you will be in a few years if you start with a plant in a one gallon pot.

In 2011, we had three different floods on this property. Hostas can take a great deal of abuse including water as long as it finally subsides which it did. The real problem with the flooding was the introduction of millions of weed seeds. Some of these came from high in the watershed either up towards Walden or over towards Molly's Falls Pond, maybe even Peacham Pond and further towards the Groton State Forest. We were more fortunate than many farmers along the river that found themselves facing a bazillion new starts of Japanese Knotweed. Our problem has been eupatorium, also known as Joe Pye Weed. The native-to-Vermont eupatorium is a great magnet to pollinators just like the hybrids, but it is a more vigorous grower and it spreads quickly from its root systems and from seeds which are abundant. 


If you happen to live in proximity to a river where knotweed is common, keep vigil in your gardens for eupatorium too. In our image up top here, the eupatorium is the dark green plant, center picture, on the right side. Once it gets established to the size pictured, it is a bear to remove because the roots have taken hold and are already deep. It can be removed, it's just work! It's far easier to get going right away on the seedlings, but do beware that even their roots grow quickly and need persistence to remove.  If you are unfamiliar with eupatorium and want to see it first hand, ask me when you stop by and I'll show you the problem that it creates. 

Writing from the mountain above Peacham Pond where the late night is quiet even though the wind continues at 4 mph.

George Africa
The Vermont Gardener
On Facebook as George Africa and also as Vermont Flower Farm and Gardens

Always here to help you grow your green thumb!